You can improve your landscape photos with these few tips
Do you want to take better landscape photos? Do you want to take your landscape photography to the next level? If you answered yes to either of these questions, you should find this article helpful. In it, we will review some basic guidelines, then I will offer more advanced tips on how to achieve the professional-level results you desire. (Each subject within this article touches on topics that I am well versed in, so if you have more questions, feel free to e-mail me.)
- Depth of Field (DOF) is an important, complex topic and one that, in my experience, most photographers do not fully understand. The good news is, even a basic understanding of DOF will take you a long way toward taking better photographs.
Here is a simple approach to understanding Depth of Field:
- DOF is represented on most cameras as f/## (digits).
- A smaller DOF (lower aperture numbers) means only the area you focus on will be sharp.
- A larger DOF (higher aperture numbers) means everything from the foreground to the background will be in focus.
This is a very rough, but simple example of a DOF scale:
- f/4 (Only the area around the focal point will be in focus)
- f/5.6
- f/8
- f/11
- f/13
- f/16
- f/18
- f/20
- f/22 (Entire scene will be in focus, and sharp)

Note that some camera lenses will provide lower and higher DOF options, as well as more granular options in between. Also, note that DOF results vary from lens to lens.
For landscape photography, it makes sense that you would want to use a larger depth of field. For example, in this photograph of the Grand Tetons (to the right), I chose a higher aperture, f/16, to ensure that the water in the foreground, trees in the middle and mountains in the distance would all be in sharp focus.
If I had used a smaller aperture, it is likely that only the water would be sharp and the rest of my image would be somewhat blurry.
Why not always use f/22 for landscape photography? There is no right or wrong answer here -- photography is a creative process and you have the freedom to take photos for your desired outcome. For me, I have found from experience that f/11 to f/16 is the "sweet spot" for the lenses I prefer to use for landscapes.
 If I find myself with a scene, such as this sunset shot of Napili Bay in Maui, Hawaii, I would use f/18, due to the rocks that are positioned closely in the foreground. I wanted to ensure sharpness across the entire scene.
In the Napili Bay example, I could have used a higher DOF, but the higher you raise the DOF, the less light you let in and the longer the shutter must be open to gain a proper exposure. I find higher apertures can lead to fuzzy images because of diffraction effects, which is a deeper subject for another article!
- Use a Tripod. If you are serious about taking good landscape photographs, a tripod is a requirement. I cannot stress this enough. I use a tripod, even in the middle of a bright sunny day. I also use a shutter release cord, to ensure my camera is absolutely as still as possible. Even with your camera on a tripod, pushing the shutter button can cause a slight vibration, which will make your image less sharp.
In situations where you may not have a tripod and need a steady shot, for most DSLR cameras you can use the mirror lockup feature, which moves the viewfinder mirror out of the way. Then, a few seconds later you can take the photo. This technique ensures that even the movement of the mirror does not create any vibration that could cause loss in sharpness of the image.
A final thought on tripods: a nice, sturdy tripod will provide more stability. Do not view your tripod as a burden, heavy to carry and cumbersome to pack on a trip. It really is the most important piece of equipment for the landscape photographer...well, next to the camera, of course.
- Composition. As with Depth of Field, there really is no right or wrong when it comes to composition, as long as you achieve the creative look you are after. However, I personally follow a few guidelines in my photography:
- If possible, I plan my shot to include foreground that is attractive and helps tell the story.
- In most situations, when the horizon is present in a landscape image, I will lend more of the scene either to the sky or more to the ground, depending on the scene. I find the result to be more dramatic.
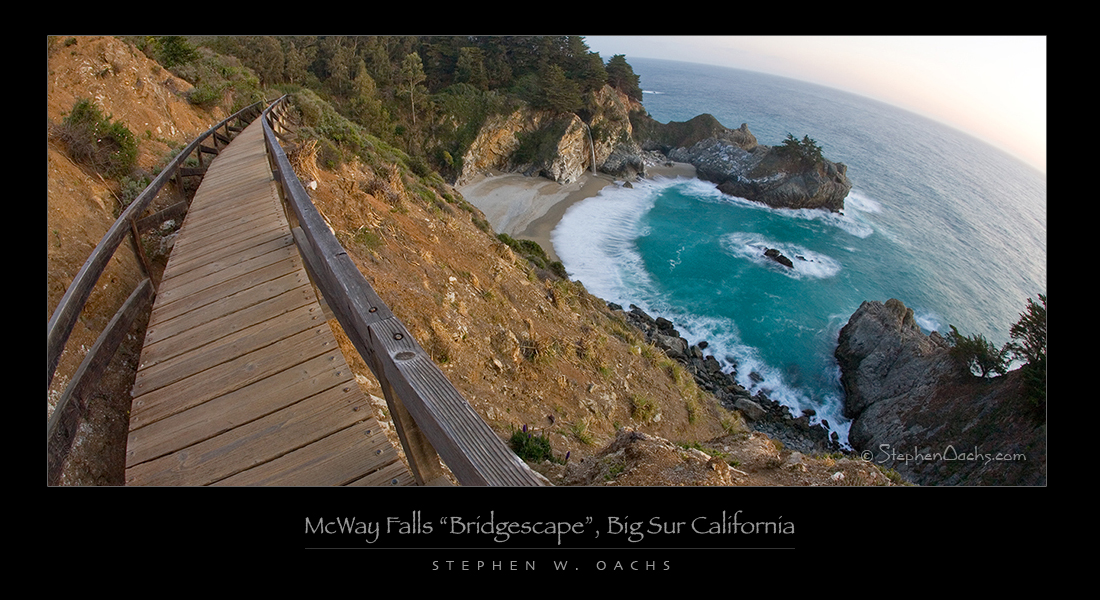
 Some of my favorite landscape photos are those that lead the eye, such as a fence line, stream, path or road that carries the eye from one area of the photo to another. Some of my favorite landscape photos are those that lead the eye, such as a fence line, stream, path or road that carries the eye from one area of the photo to another.
- Changing the point of view that you use to take a photo can often make for a more interesting image, capturing a scene in a way not typically seen, and making it your own vision.
This photo of McWay Falls was shot with a fisheye lens. It covers a couple of my composition examples, such as leading the eye along the bridge's lines, and in the perspective provided by the fisheye effect.
- Planning and Patience. I almost always plan my photography outings, but when it comes to landscape photography I plan in much more detail to take into consideration where I want to go, what I want to photograph and what story I want to tell with the chosen location. Here are some ideas to consider when planning:
- Check the weather report. Sunny days are not the only time to shoot. Partly cloudy days are my personal favorite, especially those big cotton ball-type clouds that make for big, dramatic looking skies. In addition, partly cloudy skies can make for great, colorful sunsets.
 Full moons: If you want to get creative, you can use moonlight to illuminate your scene. The effects of longer exposures with moonlight can make for dramatic scenes, such as this shot I took of McWay Falls in Big Sur under a full moon. Full moons: If you want to get creative, you can use moonlight to illuminate your scene. The effects of longer exposures with moonlight can make for dramatic scenes, such as this shot I took of McWay Falls in Big Sur under a full moon.
- Sunrise and sunset: There is no doubt that the light produced when the sun is low on the horizon is warm and dirty. Dirty? Yes. What I mean is, when the sun is low on the horizon the light has to travel farther through the atmosphere and has a greater chance of encountering dust and other particles in the air, which creates colorful effects.
- Patience is a must. I always arrive at a planned location early to see it in the daylight, to scout the area for a good or unique perspective and composition, and to set up my tripod and camera to be ready for the right time to shoot. If I'm going for a sunrise/sunset shot, I will wait, all set up, for optimal lighting conditions.
- Advanced Tips & Tricks. Once you have mastered the basics, there are a few advanced tips and tricks I like to use to improve my landscape photographs.
Shutter Delay: It is really amazing how dramatic a landscape scene can become in low light (or with the use of a filter) and a long shutter exposure. This is most effective with water and clouds. The motion of water, captured over a longer exposure, becomes silky, and clouds become ghostly and wispy. Shutter delay can also convey motion, or action, by panning the camera with a moving object.
Filters:
- Neutral Density (ND) filters allow you to reduce the light that enters the lens of your camera without the loss of color and sharpness of the scene. Think of an ND filter as sunglasses for your camera.

ND filters come in a variety of sizes, shapes and densities. Common ND filters are ND2, ND4 and ND8. The higher the number, the darker the filter and the less light that is allowed through. In certain situations, I use an ND64 to reduce the light so dramatically that I can take longer exposures in bright light, where otherwise the scene would be terribly overexposed. A good example of this is the photo (at right) that I took at Pfieffer Beach. The sunlight was still strong but I wanted a long exposure to get a ghostly effect of the ocean surf on the rocks.
Another type of ND filter is known as a "Graduated" filter, where the filter is a gradient from dark to light. This is especially useful for sunrise/sunset photography. For example, in a scene where you need to reduce the light coming from the sky, balance the exposure and gain detail in the foreground, a graduated filter will not only take care of it, but will also bring the color out of the scene that otherwise would be lost by overexposure.
- Polarizer: One of the most important things a landscape photographer can do to improve his or her photography is to become familiar with polarizing filters.
Polarizing filters can darken the sky, remove reflections from water and make foliage appear less shiny. They can also enhance color saturation significantly.
To get the most out of a polarizer, I use a circular polarizer and find the best results when I am at a 45-90 degree angle with the sun. You can achieve effects from polarizing filters even on cloudy days, but the effect is usually much more subtle. If you only have one filter in your bag, make it a polarizer - you will not be sorry!
|